Thursday, June 19, 2014

Painted Pine Cones

This is a super simple project to be done with the kids. Take the kids for a walk and gather some pine cones from under the trees on the streets. Let them grab their paints and paint brush & have some fun painting.

What you'll Need

Pine Cones
Paint
Paint Brush
Glitter Glue (optional)
Beads (optional)


Method

  1. Collect the fallen pine cones from under the trees by the end of autumn before it gets all covered with snow.
  2. Grab different colors of paint and using a regular paint brush, give 2 coats of paint on each pine cone.
  3. Let them dry completely.
  4. Use glitter glue and beads to decorate (optional)
  5. Use them to decorate the home for Christmas or however you desire.


Note
  1. Collect pine cones that are not broken & free of dirt.
  2. Kids' paint works well on these pine cones.
  3. Always use glitter once the paint is dried completely. Else, the glitter will get the color of the paint.

Monday, April 28, 2014

Maangai Paruppu Kuzhumbhu (Tirunelveli Style)

Ingredients

Toor Dhal - 1/2 cup
Moong Dhal - 1/4 cup
Brinjal - 2 (cut to bite size pieces)
Tomato - 1 (cut to bite size pieces)
Small onions -10 Nos.
Garlic pods - 5
Hing (Asafoetida) - 1 tsp
Turmeric powder - 1/2 tsp
Cumin - 1/2 tsp
Green chilli - 2
Coconut Flakes - 3 tbsp
Raw Mango - 5 big slices
Tamarind - 1 pod
Coriander leaves - To garnish
Salt - To taste

Seasoning:
Oil - 3 tbsp
Mustard - 1/4 tsp
Urad dhal - 1/4 tsp
Red chilli - 1 (optional)
Onion - 2 tbsp
Curry leaves - 10 Nos.


Method
  1. Add the following ingredients to the pressure cooker: Tood dhal, moong dhal, brinjal, tomato, onions, garlic, hing, turmeric, cumin and green chillies.
  2. Add enough water to cover the ingredients. 
  3. Pressure cook for 15 minutes over a medium - high heat.
  4. After the steam is released, mash the contents of the pressure cooker with a potato masher / 'mathu'.
  5. Add the mango slices. Add the giant mango seed (if you love mango so much like me).
  6. Soak the tamarind in water and add the tamarind extract.
  7. Add more water if needed.
  8. Add in the coconut flakes.
  9. Do the seasoning and add to the cooker.
  10. Boil (with lid open) for about 15 minutes till the mango is completely cooked.
  11. Garnish with coriander leaves.
  12. Serve with white rice / brown rice / dosa / pongal.
  13. With 'no tamarind' serve with idlis.
Note
  1. Reduce tamarind when more mango slices are added.
  2. Tamarind can be completely removed from the list and can be replaced by a whole big mango & 3 tomatoes.

Sunday, April 13, 2014

Easter Basket

Easter is right around the corner and now is the perfect time to make these super cute Easter baskets to present to your loved ones.

Easter is not about the eggs or bunnies or chicken or spring . Its all about " Jesus died for my sins ....but HE rose again the third day. HE IS ALIVE!!!" So what is more fun about these baskets is that you can hide a note of hope and faith inside the egg along with the candies,  like "He is risen" , "My Redeemer lives" , etc.


What You'll Need:

Card stock / Scrapbook Paper / Patterned printed A4 sheet -1
Coffee Filter - 1
Cupcake liner - 1
Contrast color paper strip / ribbon -  to make a bow
White School Glue
Easter Grass / Strips of green tissue paper
Plastic Eggs -2
Candies (of choice)
Notes of hope / faith -  Handwritten or printed

How to do:

  1. Cut the card stock paper about 10" x 2". Cut another patterned paper about 10" x 1". Glue the patterned paper on top of the other. 
  2. Glue the ends together to make the base of the basket.
  3. Cut the upper half of the coffee filter and glue it to the inside of the base of the basket.
  4. Cut the card stock paper about 10" x 1". Cut another patterned paper about 10" x 1/2". Glue the patterned paper on top of the other. This makes the handle of the basket.
  5. Glue the handle to the inside of the coffee filter. (This will be hidden later)
  6. Now, glue the cupcake liner to the inside of coffee filter.
  7. Make a paper or ribbon bow and glue to the handle.
  8. Fill the basket with Easter grass (available in craft stores) or strips of green tissue paper and candy filled eggs with the note of hope.
  9. Surprise your loved ones.
  10. Have a blessed Easter.


Saturday, March 29, 2014

Egg Carton Bulletin Board

What you'll Need

Cardboard Egg Cartons
Paint (optional)
Push Pins

Method

  1. Take the cardboard egg cartons and paint them however you want. (But it took me a lot of paint than expected)
  2. Using push pins, fix them to the wall.(once the paint is all dried up)
  3. Your bulletin board is ready to use.
  4. Use school glue to put up any info on the bulletin board. The papers can be removed easily when not required.

Saturday, March 22, 2014

Oven Baked Fish

Ingredients

Fish Pieces - 10 Nos.
Fish Fry Masala - 2 tbsp
Red Chilli powder - 1/2 tbsp
Turmeric (optional) - 1/4 tsp
Salt - To Taste
Lemon Juice - About 10 drops


Method

Marinating:

  1. Wash the fish pieces really well. Drain the water completely.
  2. Take the fish pieces in a bowl. Add all the other ingredients to the fish pieces.
  3. Mix them well. Check for salt.
  4. Keep in the freezer for an hour OR refrigerate 2 - 3 hrs.
Baking in the Oven:
  1. Pre - heat the oven to 400 F.
  2. Grease a baking tray with oil (Olive oil / any refined oil)
  3. Arrange the fish pieces on the baking tray.
  4. Bake for 20 minutes on the lower- most tray.
  5. Flip over the fish pieces and bake for another 20 min.
  6. Turn the oven to BROIL mode and broil the fish for 2 -3 min.
  7. Serve as an appetizer OR enjoy as a side with rice and fish kuzhumbhu / sambhar / paruppu kuzhumbhu / dhal or any variety rice.
Note
  1. Every oven is different. So baking time may change a bit by + / - 5 min.
  2. If the fish pieces are thin, then 20 + 20 minutes should be fine for baking. If the pieces are thick, then 10 more minutes is needed for perfect cooking.
  3. The Fish Fry masala can be replaced by 1 tbsp of red chilli powder.
  4. In case, after 10 min of baking, if the baking tray has water oozed out from the fish, do the following: take all the fish pieces in a bowl, pour out the water in the sink, add little salt and chilli powder (to compensate for their loss in the water) arrange them back in the tray and continue baking.

Friday, February 28, 2014

Christmas Picture Frames


What you'll Need

Picture Frames (with framing glass)
Onion Bags
Christmas bows

Method

  1. Take the photo frames you wish to use. I bought these 2 photo frames at Ikea for $1 (pretty cheap...right?)
  2. Take out the picture framing glass and use it to cut a perfect size of the onion bag.
  3. Hold the cut onion bag along with the picture framing glass, and carefully insert them into the picture frame.
  4. Slowly remove the picture framing glass. 
  5. Use a bow around the frame to give a christmas feel.
  6. Use them along with the other christmas decorations.

Note
  1. I used 'red pearl onion ' bags, because the bags are strong , tightly weaved and red in color.
  2. In the same way, 'yellow pearl onion' bags can be used to make some Easter picture frames.

Monday, February 10, 2014

Doily Mail Envelope


Valentine's day is almost here & as my kiddo wanted to make cards for all his friends at class, we came out with the idea of these super cute easy - to - make envelopes to hold the cards we made. They turned out so cute and lovely.


What You'll Need

Heart Doilies
Stickers
Cards / Notes / Paintings / Pictures - To go in the envelopes


Method

  1. Lay flat a heart doily with the (preferred) side down.
  2. Fold one side towards the center.
  3. Fold the other side towards the center so that both flaps overlap / touch each other.
  4. Fold in the corners (top of pic 4) so they won't peek out.
  5. Fold in this side towards the center.
  6. Slide in a card / picture of your choice.
  7. Close the envelope and seal it with glue / sticker.
  8. Turn to the other side, write the address and stamp it.
  9. Your doily mail envelope is ready to be delivered.


Tuesday, January 28, 2014

Paper Mache Planets


What you'll Need

Balloons
Cloth clips
Paint
All purpose Flour
Water
Bowl / Glass of different sizes to hold the balloons
Newspaper strips
Thin Rope - For tying & hanging

Method

  1. Blow up the balloons corresponding to the size of the planets and tie a knot on each balloon. (Mercury is small...Jupiter is the largest....Other planets' size vary in-between)
  2. Hold a balloon in a bowl / glass so its easy to apply the paper mache.
  3. In a big bowl, mix 1 part of flour to 2 parts of water. 
  4. Tear the newspaper into 2 cm wide strips.
  5. Dip a strip of newspaper into the flour - water mixture, wipe off the excess and stick on the balloon.
  6. Do this until the balloon is completely covered with the paper strips (except the balloon knot)
  7. Now the first layer of paper mache is done. 
  8. Using a cloth clip on the balloon knot, hang on a hanger and let it dry overnight.
  9. Do another layer of paper mache and dry overnight.
  10. Do a third layer of paper mache and dry as before. (3 layers are needed else the planets can deform easily)
  11. Poke a small hole in the balloon to release the air and take the balloon out.
  12. Seal the top hole with paper mache. (I don't do this because the hole is gonna face the roof and can't be seen)
  13. Grab some paint and paint the planet with a paint brush (like kids use for painting)
  14. Punch / poke 2 small holes and tie a knot with a rope easy enough for hanging.
  15. Do like this for all the planets.


Special Note
  1. To make Saturn's ring, I cut out the center of a small paper plate and painted it with the brightest color I had. Make sure to insert the ring from above through the rope before hanging it.
  2. Make sure the paper mache dries completely before adding each layer to avoid deformation.
  3. The paint I used are from my kids' cabinet. They worked amazingly.
  4. For small planets, I used water balloons.
  5. Pluto may not be considered as a planet now by scientists.
  6. In the flour to water mixture, the water proportion can always be varied between 1 1/2 to 2 parts for every 1 part of flour.
  7. After some google search, I figured out the following colors for the planets:  
Planets
Colors Used
Mercury
Brown & dark yellow
Venus
Light yellow, orange & red
Earth
Green, light blue, dark blue & white
Mars
Dark red & black
Jupiter
Dark drown & light brown
Saturn
Green with a bright colored ring
Uranus
Light blue
Neptune
Dark blue
Pluto
Black

Friday, January 24, 2014

Kuruma Kuzhumbhu


Kuruma Kuzhumbhu is a rice accompaniment with the flavours of kuruma since the masala includes fennel along with ginger & garlic....but also includes tamarind which makes it go well with rice.


Ingredients

Oil - 1 tbsp
Cinnamon - 1 inch piece
Potatoes - 1 (cut into big cubes)
Tomato - 1
Tamarind - 1 pod
Red chilli powder - 2 tsp
Coriander powder - 2 tsp
Turmeric powder - 1/4 tsp
Salt - To Taste

For Masala:

Coconut flakes - 1/4 cup
Fennel (Perunjeeragam) - 1 tsp
Ginger - 1/2 inch piece
Garlic - 3 pods

For Seasoning:

Oil - 2 tbsp
Mustard - 1/4 tsp
Urad dhal - 1/4 tsp
Chopped Onion - 1 tbsp
Curry leaves - 10 Nos.

Method

  1. In a pan, add 1 tbsp of oil & add the cinnamon.
  2. Now add the potato cubes and tomato slices and fry them for a minute.
  3. In a mixer / blender, grind the masala with a little water, and add to the pan.
  4. Soak the tamarind in water & add in the tamarind extract.
  5. Add the chilli powder, coriander powder, turmeric powder & salt.
  6. Let this boil on a medium heat till its half - way done.
  7. Do the seasoning and add to the pan.
  8. Boil on a low - medium heat till the required consistency is reached.
  9. Serve with white rice / brown rice.


Note
  1. Ginger and garlic can be replaced by ginger - garlic paste. About 1 1/2 tsp of ginger - garlic paste can be added.

Tuesday, January 21, 2014

Avial (Tirunelveli Style)


Ingredients

Carrot - 1 (large)
Beans - 10
Peas - 1/2 handful
Potato - 1/2 (large)
Brinjal - 2
Raw Mango (optional) - 1/2 
Plantain (Valaikkai) (optional) - 1
Cauliflower (optional) - 10 florets
Drumstick (optional) - 2
Tomato (optional)
Tamarind - 1/2 pod
Turmeric - 1/2 tsp
Salt - To taste
Water (As needed) - To cook veges

For Masala:

Coconut Flakes - 1/4 cup
Green Chillies - As needed
Cumin - 1/2 tbsp

For Seasoning:

Oil - 2tbsp
Mustard - 1/4 tsp
Urad Dhal - 1/4 tsp
Chopped Onion - 2 tbsp
Curry Leaves - 10 Nos.

Method
  1. Have a bowl of water ready to put the cut vegetables, so they won't change color.
  2. Slice the carrots round or cut them into 1 inch cubes.
  3. Cut the beans into 1 inch long pieces.
  4. Cut the brinjal, potato, mango and plantain into 1 inch cubes.
  5. Cut the drumstick into 2 inch long pieces.
  6. Add all these veges to the bowl of water and wash them really good.
  7. To a pan, add all the vegetables. Add tomato if desired.
  8. Add turmeric and salt.
  9. Add tamarind water. 
  10. Add water enough to cover the vegetables. Cook them on a med - high heat, till they are half way done.
  11. In a mixer / blender, grind the masala to a fine paste, adding little water.
  12. Now, add the masala to the vegetables.
  13. Do the seasoning and add to the vegetables.
  14. Check for salt at this point.
  15. Using a spatula, very gently turn the veges, every 2 minutes.
  16. Simmer at a low - medium heat until all the water is evaporated.
  17. Serve as a side for rice with sambhar or dhal.

Note
  1. I personally prefer to add brinjal 'coz it gets kind of mashed easily and the seeds give a beautiful look and feel to the dish. Eggplant, on the other hand, can also be added, but it just gets soft when cooked.
  2. The optional vegetables can be skipped while making the dish.

Sunday, September 29, 2013

Kaju Katli (Kaju Katri)

Kaju Katli is one of the most famous, most yummiest and of course, one of the costliest sweets in India.

Also known as Kaju Katri (or) Kaju Barfi, this sweet is enjoyed by both adults & especially by kids.

Just eat one, & I promise ...you will be tempted to eat more and more till there is only a few left to share with others. (I know what you will think now). Go ahead & finish them too. Its always easy to make another batch to share with others.

This recipe makes kaju katlis enough for a dad & a hungry toddler while mom eats just 2 pieces while enjoying the smile & happiness of her family.


Ingredients

Cashew - 2 cups (at room temperature)
Water - 1 cup
Sugar - 1/2 cup
Milk - 1 tbsp
Ghee - 1 tbsp
Edible Silver Foil (optional)
Parchment Paper

Method

  1. In a mixie / blender, finely powder the cashew pieces. 
  2. In a pan ,add water and sugar and let them come to a boil on a high heat.
  3. Boil on a high heat till the water level reduces to half.
  4. Now reduce to a medium heat & use a spatula to stir the sugar solution. If you lift the spatula sideways now, the sugar solution will fall down really fast and will be watery.
  5. Keep stirring until you reach the point at which " when you lift the spatula sideways, the sugar solution will drop down in sticky long slow strands".
  6. Now, add in the milk and ghee.
  7. Reduce the heat to a LOW temperature. Now add in the cashew powder.
  8. Hold on to the pan really really tight & stir with the spatula really really fast.
  9. The cashew will start sticking to the pan really fast. So use all the mighty power of your hands and stir for about 2 min.
  10. Turn off the stove and transfer the contents to a bowl.
  11. Let this cool off a little bit and then knead with your hands (while it is still warm) for 30 sec.
  12. Transfer this cashew dough to a parchment paper. Put another parchment paper on top of the cashew dough and roll it with a rolling pin (thick or thin)
  13. Take the edible silver foil sheet one by one and cover the rolled out cashew dough. (This is little tricky but fun). Ask for this edible silver foil in an Indian grocery store at the counter because they don't keep these in the aisle.
  14. Cut into diamond shapes (traditionally) or any shape of your kid's choice using a knife or a pizza cutter.
  15. Kaju Katli has a long shelf life and stays good in your closet for about a week. (But that is not needed 'coz it will be over in a day or two)
  16. Enjoy with your loved ones this amazing, easy to make, delicious sweet of Indian origin.

Tuesday, September 10, 2013

Trophy / Pencil Holder

This is a great craft project for kids at home or at school. With some available supplies at home, kids can make many pencil holders and take pride in organizing their stationary size wise / color wise.

Also, the trophy can be given to friends / teachers for friendship day or teacher's day. Kids can also make them for their #1 dad or #1 mom or #1 grandparents.

What you'll Need

Foam Cup / Paper Cup  - 1
Dessert Bowl (Foam / Paper) -1
Glue
Construction Paper / Card Stock Paper -1
Feathers / Beads / Glitter / Sequins / Stickers / Markers- To decorate

How to Make

  1. First, make sure the bottom of the cup and the bowl are of the same size.
  2. Turn the bowl upside down (this acts as a stand) and apply glue generously on it.
  3. Fix the bottom of the cup on this glue. (That's it for the pencil holder )
  4. Fix some beads or sequins to cover the joint.
  5. Cut 2 'alphabet C' or 2 'question marks "? " ' from the construction paper or card stock.
  6. Glue to the sides of the cup, folding the edges a little. (That's it for the trophy)
  7. Decorate however you like.(I glued some feathers to the inside of the cup. Applied some glitter glue randomly, let it dry for 5 min and spread with a finger or paper towel)
  8. Organize kid's stationary in these bright beautiful pencil holders OR let kids present to someone they love on special occasions.


Tuesday, August 6, 2013

Cauliflower Roast

Ingredients

1/2 of a large cauliflower
Chilli sauce - 2 tbsp
Corn Starch - 2 tbsp
Red chilli powder - 1/2 tbsp
Pepper powder - 1/4 tbsp
Cumin powder - 1/4 tbsp
Garam masala - 1/4 tbsp
Salt - To taste
Water / Oil - 1 tbsp
Coriander leaves - To Garnish (optional)

Seasoning:
Oil - 1 tbsp
Mustard + Urad dhal - 1 tsp
Curry leaves - 5 Nos.
Chopped Onion - 1tsp

Method

  1. Separate the cauliflower florets and cut them into small bite-sized pieces. Wash thoroughly under running water and dry them with a paper towel. (ie) Make sure the florets are not too wet after washing to avoid the masala to be too watery.
  2. In a mixing bowl, add all the other ingredients and mix them thoroughly without any lumps.
  3. Add in the cauliflower and mix well to get a uniform coat of masala on all cauliflower florets.
  4. Arrange them in a greased baking tray and bake for 20 min in a 450 F preheated oven. (This is to make sure the masala is almost cooked and the florets are 3/4th cooked.So when we roast this again on stovetop, the cauliflower florets will not turn mushy b'coz of the added chilli sauce.)
  5. In a frying pan, do the seasoning and add in the cauliflower florets. Cook in a low heat for 10 - 15 min until the florets are completely cooked but not mushy.
  6. Garnish with coriander leaves.
  7. Serve as a side or as an appetizer. 


Note

This dish can be done on stove top alone (in case there is no oven). 
  1. Do the seasoning.
  2. Add in the masala mix and cook for 2 min in a low - medium heat.
  3. Add in the florets and cook in a low - medium heat till its done.
The taste will be little different b'coz we cook the sauce in the oil initially. But hopefully this will turn out good.(I have never tried this stovetop alone version though)

Monday, July 1, 2013

I'm Back.....

I am back..... Yeah! back from my pretty long vacation to India, came back from India really lazy after months of sitting & eating & sleeping....then jumped into crafty action for my little pumpkin's 4th birthday party...

Now....I'm little busy (its summer vacation for my kiddo now) but hope to get some free time to blog....

Keep reading & acting guys....

Monday, November 12, 2012

Vegetable Soup (Indian Italian Combo)

Apart from jam and jelly, what could be a better accompaniment for croissant? Then my thought went to Olive Garden where we have bread sticks with soup. Ta - Da - Da.....Why should not I try some kind of soup that will go well with croissant? I made it Indian style with a nice Italian touch.....& it was just amazing with those buttery flaky croissants....

Try this soup with croissant or bread or simply as such for a healthy filling breakfast.

Ingredients

Olive Oil - 2 tbsp (Refined Oil can also be used)
Onion - 1/2 handful ( finely chopped  )
Tomatoes - 2 ( finely chopped)
Carrot - 1 handful ( finely chopped )
Beans - 1 handful ( finely chopped )
Green Peas - 1/2 handful ( finely chopped )
Spinach - 1 handful ( finely chopped )
Sweet Corn - 1 handful ( finely chopped )
Red Chilli Powder - 1/2 tbsp
Turmeric Powder - 1/4 tsp
Italian Seasoning - 1 tbsp
Fresh Basil (optional ) - 1 tbsp ( finely chopped )
Coriander Leaves - 1/2  handful ( finely chopped )
Parsley ( optional ) - 1/4 handful ( finely chopped )
Salt - To Taste
Water - twice the amount of final required soup consistency

Method

  1. In a pan, add oil. When hot, add the onion.
  2. Saute the onions till they turn slightly transparent.
  3. Add the tomatoes and saute for 2 min. It is not required that tomatoes should turn mushy.
  4. Add the vegetables one after the other and saute for about 2 min.
  5. Add the chilli powder and turmeric & saute for a minute.
  6. Add the Italian seasoning, the parsley and coriander leaves with required salt.
  7. Add water and let this boil on a high flame for about 15 min till the veges are cooked & the amount of water reduces to half.
  8. The final consistency should be a watery soup good enough to dip the bread / croissant.
  9. Serve with bread / croissant / bread sticks or have the soup as such.


Note
  1. Vegetables can be added of any choice. Even bitter gourd (pagarkai) can be added while preparing the soup for diabetic people.
  2. Its easy to prepare and healthy to eat since it includes many vegetables.
  3. Even leftover veges can be used to make this soup.
  4. The taste of the soup varies with the veges added.

Friday, November 2, 2012

Peas (Pattani) Kuruma

Ingredients

Peas - 1 cup (soaked overnight)
Coconut Grating - 1/2 cup
Green Chillies - 4
Fennel (Perunjeeragam) - 1 tbsp
Ginger - 1 inch piece
Garlic - 5 big pods
Oil - 2 tbsp
Mustard + Urad dhal - 1 tbsp
Curry Leaves - 5 Nos.
Onion (chopped) - 1 handful
Tomato (chopped) - 1
Coriander Powder - 1/2 tbsp
Red Chilli Powder - 1/4 tbsp
Turmeric Powder - 1/4 tbsp
Garam Masala - 1/2 tbsp
Salt - To Taste
Water - As needed
Coriander Leaves - To Garnish

Method

  1. In a pressure cooker, add the soaked peas, little salt and water just to cover the peas. Pressure cook on a MEDIUM heat for about 10 min.
  2. In a mixer / blender, grind the coconut, green chillies, fennel, ginger and garlic with little amount of water.
  3. In a pan, add oil.
  4. When hot, add mustard, urad dhal, curry leaves and onion....one after the other.
  5. When the onion is fried well, add the chopped tomatoes.
  6. Fry until the tomatoes turn mushy.
  7. Add all the masala powders, salt and fry for a minute in a MEDIUM heat.
  8. Add the grind masala and fry for 2 min in a MEDIUM heat. (Careful....the masala may splatter on the hands)
  9. Add the cooked peas with necessary water.
  10. Check for salt and chilli powder.
  11. Boil in a medium - high heat till the required consistency is reached.
  12. Garnish with coriander leaves.
  13. Serve with poori, chappathi, paratha, idly or dosa.


Note
  1. Peas can be replaced by green peas. The green peas can be added directly and allowed to cook. No need to pressure cook. But the taste of the kuruma will be different.
  2. Apart from a good accompaniment for bread varieties, this goes well with idly / dosa.

Sunday, October 28, 2012

Newspaper Birthday Crown

I made a birthday crown for my kid's 3rd birthday & it looked so amazing on his head during his birthday party. I made it 'red' to match his Red Birthday Shirt.

I saved some ceiling decors from his 2nd birthday which I used for this birthday crown. Also, his birthday party theme was from PBS kids. So I used some stickers related to the theme.

What you'll Need

Newspaper - 1 sheet (4 pages)
Stapler
Cello-tape
Ribbon (I saved the one I got with a blanket )
Glue
Cut outs / Photos / Feathers / Stickers / Sequins - To decorate

How to make

  1. Open the newspaper and start rolling from one corner (diagonally)
  2. Adjust the height of the crown while rolling (let the crown be of smaller height for kids and more for adults)
  3. Place the crown around the head to know the size of the crown and staple the edges. If required, put some cello-tape over the staple to avoid hurting the head.
  4. Wind the ribbon all - around the crown overlapping, so that the newspaper is not visible anywhere. 
  5. Glue the edges of the ribbon to the newspaper at the back side of the crown.
  6. Decorate however you want.
  7. Newspaper birthday crown is ready for the party.


Note
  1. These crowns are so easy to make that they can be made for all the kids at the party with specific colors and designs for boys and girls to match the theme.
  2. These crowns can also be made for Christmas parties, New year parties or any family get-together (at-least for the kids)

The Birthday Boy at the party with his Birthday Crown 

Sunday, October 14, 2012

Bottle Gourd (Suraikaai) Curry / Kootu

Ingredients

Bottle Gourd (Suraikaai) - 1 (small)
Toor dhal / Moong dhal / Channa dhal - 1 handful
Garlic - 3 pods
Hing - 1 tsp
Green Chillies - 2 (slit lengthwise)
Onion (chopped) - 1 handful
Tomato - 1 (chopped)
Turmeric - 1/4 tbsp
Salt - To taste
Seasoning
Oil - 1 tbsp
Mustard + Urad dhal - 1/2 tbsp
Red Chillies - 2
Curry leaves - 5 Nos.

Method

  1. Peel the skin of bottle gourd and cut them into bite sized cubes. (No need to remove the seeds. They will be soft and get cooked easily.)
  2. Add the bottle gourd pieces, dhal, garlic, hing, green chillies, onion, tomato, turmeric and salt to a pressure cooker.
  3. For curry, add water just to cover the ingredients. For kootu, add 1/2 cup less water.
  4. Cook on HIGH until the first whistle.
  5. Now, turn the stove onto MEDIUM heat and cook for 7 - 10 min.(We want the dhal to be well cooked and mushy but the bottle gourd pieces need to be cooked just right.)
  6. Using a "matthu" mash the pressure cooker contents for about 5 sec.
  7. Do the seasoning and add to the cooker.
  8. Serve with white rice / chappathi / idly / dosa / paratha.


Note
  1. If you have a big bottle gourd, use 1/2 or 1/3rd at a time. The remaining bottle gourd stays good in the refrigerator. This can be used another week.
  2. The taste of the curry / kootu changes with the dhal used. The curry tastes best with toor dhal.
  3. Bottle gourd gives a sweet taste to the curry. So add chillies accordingly.
  4. While mashing the cooker contents, I take utmost care not to mash the bottle gourd pieces but the dhal alone.

Sunday, September 30, 2012

Mutton Kuzhumbhu (Tirunelveli Style)

Ingredients

Mutton (Goat) - 1/2 lb or 1/4 kg
Potato - 1(big)
Small Onions OR (Equivalent big onion) - 1 handful (chopped)
Tomato - 1
Salt - To taste + to pressure cook mutton
Turmeric Powder - 1/4 tbsp
Red Chilli Powder (optional) - 1/4 tbsp
Water - To cook mutton + for kuzhumbhu
Coriander leaves - To Garnish
For Roasting & Grinding:
Cinnamon - 1 inch piece
Red Chillies - 4
Ginger - 2 inch piece (finely chopped)
Cumin (Jeera) - 1/2 tbsp
Fennel (Perunjeeragam) - 1/2 tbsp
Whole Pepper - 1/2 tbsp
Coriander Powder - 3/4 tbsp
Coconut gratings - 1/4 cup
Seasoning:
Gingelly Oil (Sesame Oil) - 2 tbsp
Mustard (Kadugu) - 1/4 tbsp
Urad dhal - 1/4 tbsp
Chopped Onion - 2 tbsp
Curry leaves - 10 Nos.

Method
  1. Cut the mutton into bite- sized pieces and wash them thoroughly. It is good to include some bone pieces and fat along with the mutton pieces to enhance the taste of the kuzhumbhu.
  2. Cook the mutton pieces along with salt, turmeric powder and water(just enough to cover the pieces) in a pressure cooker. The cooking time will be less for young goat and more for aged goat or lamb.(I normally cook mutton for 15 - 20 min in a medium heat, after the first whistle)
  3. In a frying pan, dry roast the ingredients under "For Roasting & Grinding"  over medium heat until a nice aroma is got. Grind them along with little water to a fine paste.
  4. Now, open the pressure cooker and add the grind masala to the cooked mutton.
  5. Grind the onions and add to the cooker.
  6. Grind the tomato and add to the cooker.
  7. Peel the skin of potato, cut them into big pieces and add them to cooker.
  8. Add red chilli powder and salt, if necessary.
  9. Add required water. DO NOT close the cooker.
  10. Do the seasoning and add to the cooker.
  11. Boil and simmer to the required consistency.
  12. Garnish with coriander leaves.
  13. Serve with white rice / idly / dosa / aapam / poori / chappathi / parotta / paratha or biryani. 


Wednesday, September 19, 2012

Blue & White Birthday Bath Fun

My husband's birthday was about to come and I was busy planning some surprises for him. At the same time, I wanted my 3 yr old to be entertained, surprised and to have loads of fun.

I decided to go for a "blue & white" birthday party. A part of the plan is to surprise him when he goes for a shower after his gym time. My little one loves to play with water any time...and.....

 Here it is....the magic of blue water...everything in blue or white or blue & white combo...


Here starts the fun arrangements of surprise & entertainment:


Since it was a "blue & white" party, I bought a blue notepad (had 150 sheets) from the dollar store. On one sheet, I wrote 'open for a birthday surprise' and attached to the door.


I took 13 notepad sheets and cut them into triangular shapes in the lower half, to give them the banner shape. I attached them above the bath tub with some cello-tape, so that it can be seen once the door is opened.


I bought a pack of 20 balloons along with an air pump for $1 from a dollar store and used all the blue balloons wherever possible.


I made a crown for the 'birthday boy' out of the balloons and hung it on the tap.


On the top of the flush tank, I arranged a few air fresheners and decorated with some balloons. I got the glade air freshener for about $2 from soap.com and $1 glass bowl from dollar store and $1 blue scented crystals from dollar store.


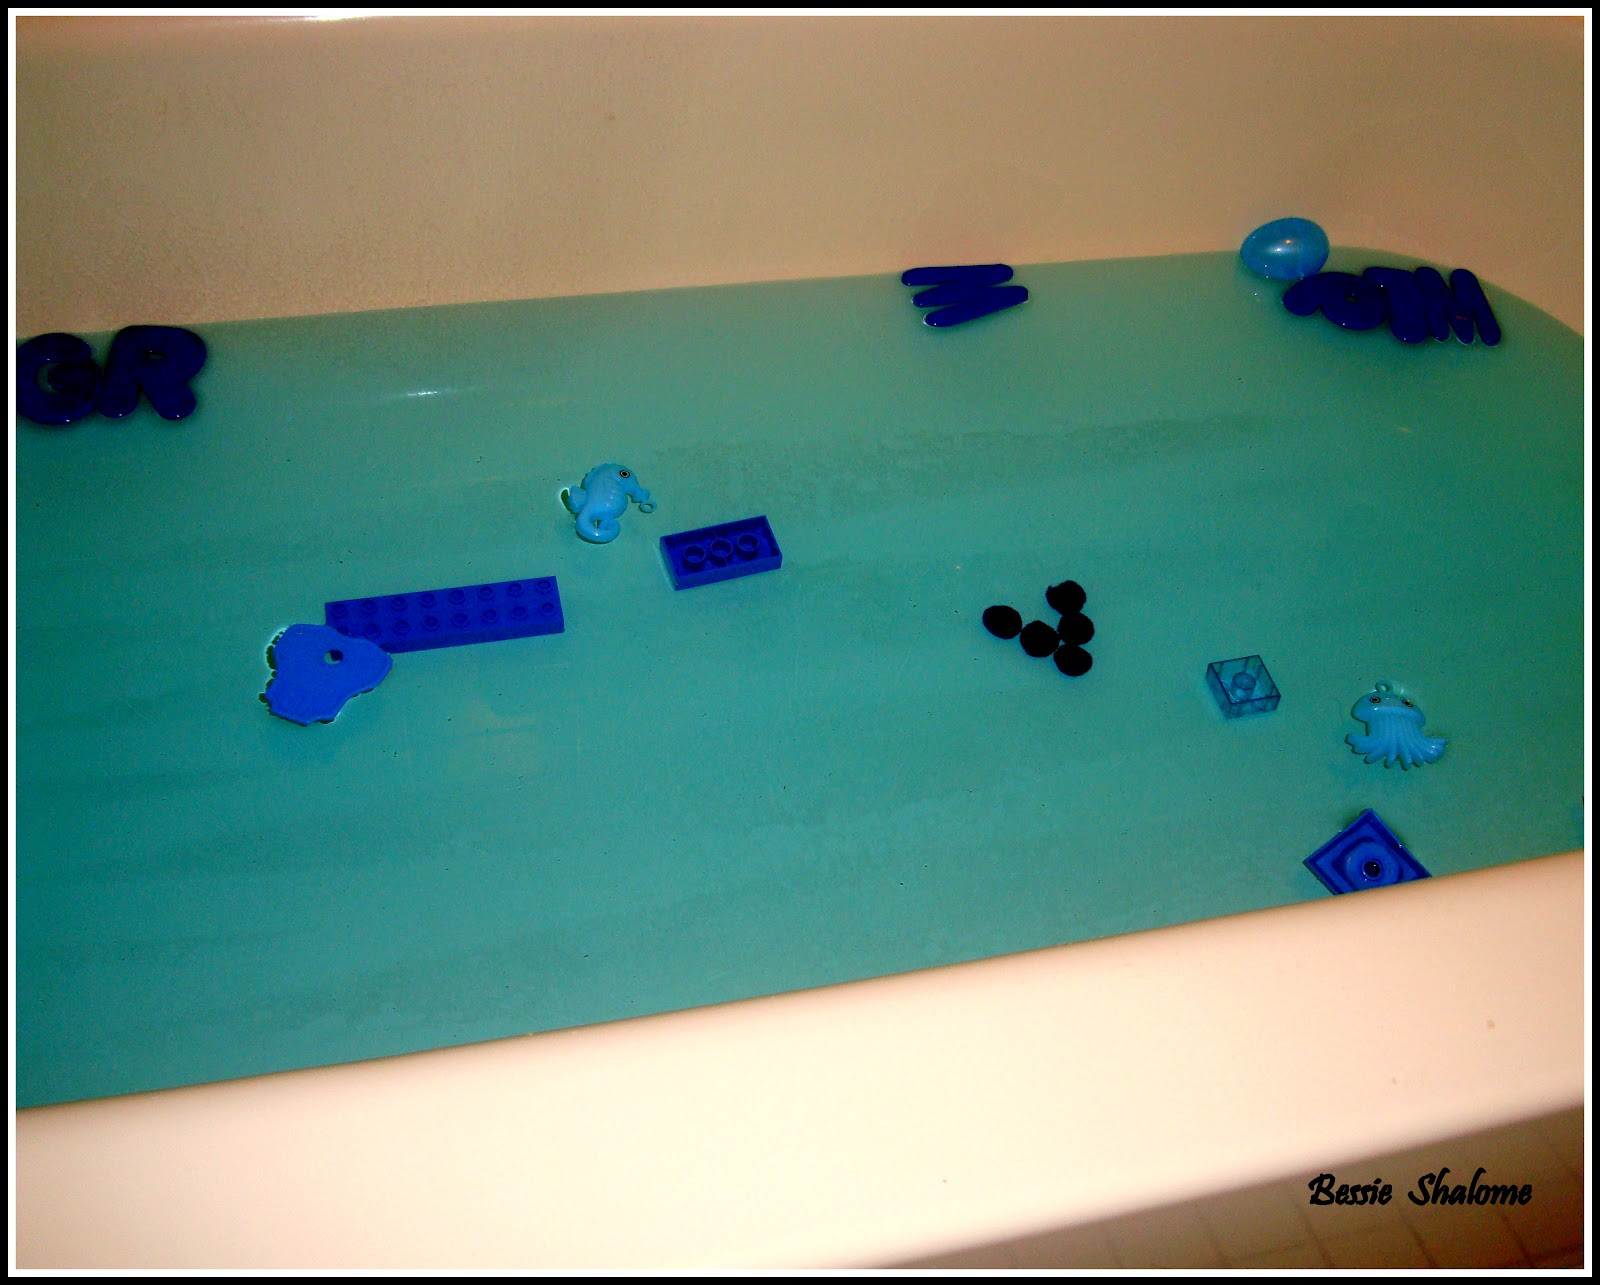
I collected all the blue and white toys from my kids toys' room and spread them in the bathtub.


Look at the 'blue & white' bath sponge, white soap and a blue egg. Inside the egg, I kept a small surprise for my kid. I bought some water toys and kept them as gift for the b'day boy .....(but, actually for my kid)


This is another b'day gift.....yeah...that too for my kid to enjoy. But dad gets the credit of opening the pack and operating it.


This is the most fun and exciting part. A few drops of blue food coloring does this magic. Open the tap to fill the bath tub. Meanwhile add a few drops of blue food coloring to the water. Look at the water turning into a deep blue sea....

It is totally safe to use food coloring in water for bath. It does not cause any skin irritations or harm. I have tried with various other food colors.


Oh! What a joy for my little one....to play with dad ...with his new toys... balloon fight......in blue water.


I am totally satisfied to see the surprised face of my beloved husband and the happiness, fun and excitement of my kid. I am proud that my thoughts and actions brought smiles on the two cute faces.

Total Decoration Cost:

20 balloons + air pump - $1
Blue Notepad (150 sheets) - $1
Glade air freshener - $2
Glass bowl - $1
Blue scented crystals - $1
Bath sponge - $1
Blue toys - $0 (available at home)
B'day gifts - optional
Blue food color - less than $1

The total cost will come around very less than $10. An economic and fun way to surprise your loved ones on  special days and occasions.

Friday, September 7, 2012

Onion Raita (Pachadi)

Ingredients

Big onion - 1 (chopped or sliced lengthwise)
Green chillies (chopped) - 2
Curry leaves (chopped) - 10 Nos.
Coriander leaves (chopped) - 5 stems
Carrot (grated) - 2 tbsp (optional)
Tomato (finely chopped) - 1 (optional)
Thick Curd - As needed
Salt - To taste

Method
  1. In a bowl, add all the ingredients.
  2. Mix them thoroughly & check for salt.
  3. Serve as a side for biryani / variety rice.
  4. This also goes well with parotta and chappathi.


Sunday, September 2, 2012

Mint Rice

Preparing a healthy meal for the whole family with ingredients fresh from the garden.....What a joy !!!

Ingredients

Basmati Rice - 1 cup
Water - 2 cups
Mint - 1 bunch
Ginger - 2 inch piece
Garlic - 2 large pods
Green chillies - 3
Onion (chopped) - 1 handful
Carrot (chopped) - 1/2 handful (optional)
Beans (chopped) - 1/2 handful (optional)
Peas - 1/2 handful (optional)
Paneer cubes - 10 Nos. (optional)
Garam masala - 1/2 tbsp
Salt - To Taste
Oil - 2 tbsp

Method
  1. Wash the basmati rice and soak it for 30 min.
  2. Separate the mint leaves from the stems & wash them under cold water.
  3. In a mixie / blender, grind the mint leaves, ginger, garlic & green chillies to a coarse paste adding little water.
  4. In a wide bottom pan, add oil.
  5. When hot, add the chopped onions.
  6. When they turn transparent, add the chopped vegetables and fry for 3 min.
  7. Now add the grind mixture and fry for about 3 min till the raw smell of mint goes off.
  8. Now, add the paneer cubes and the garam masala & fry for another 1 min.
  9. Add the soaked rice with necessary salt & 2 cups of water.
  10. Give a good mix and check for salt.
  11. Cover cook in a medium heat until all the water is absorbed by the rice.
  12. Give a gentle mix and reduce to a low heat.
  13. Cover the pan & let this sit for another 10 min.
  14. Turn off the heat and give one last gentle mix.
  15. Serve with raita or any fries.


Thursday, August 16, 2012

Coriander Chutney (Green Chutney)

Ingredients

Coriander leaves - 1/2 bunch
Cumin - 1/2 tbsp
Garlic pods - 2 large
Tamarind - 1 inch piece
Green chillies - 2
Coconut gratings - 5 tbsp
Salt - To taste
Water - To grind
Seasoning
Oil - 1 tbsp
Mustard + Urad dhal - 1 tsp

Method

  1. Roughly chop the coriander leaves and roast over a medium heat in a frying pan for about 3 min. 
  2. Let this cool to room temperature.
  3. In a mixie / blender, add the roasted coriander leaves along with the cumin seeds, garlic, tamarind, green chillies, coconut and salt with little water just to grind them to the required consistency.
  4. Do the seasoning and add to the chutney.
  5. Serve as a side for idly / dosa / masala dosa / rava dosa or paniyarams.
  6. This can also be served as a dip for samosas & chips.


Thursday, August 9, 2012

Roasted Egg

This is a simple, easy to make appetizer or side dish with very less ingredients. I once prepared these for my kids' b'day party and it was rated #1 out of all the other homemade & restaurant ordered foods

Ingredients

Eggs - 4
Water - To boil the eggs
Salt - 1tsp + 1 1/2 tsp
Red Chilli powder - 1 tbsp
Oil - To brush the pan (or) 1 tbsp

Method

  1. Boil the eggs in a pan with 1 tsp salt & sufficient water for about 15 min in a medium - high heat.
  2. Break the egg shells & cut the eggs into half (cut from top to bottom)
  3. Brush a frying pan with oil under medium heat.
  4. Sprinkle 1 1/2 tsp salt and 1 tbsp chilli powder.
  5. Make sure the salt & chilli  powder are spread throughout the pan.
  6. Arrange the cut eggs, with the yellow facing down.
  7. Roast for 2 min.
  8. Now, turn the eggs so that the other side also gets roasted for another 2 min.
  9. Serve hot / warm / or at room temperature.
  10. Serve as a party appetizer or as a side for any rice variety or biryani.


Wednesday, August 1, 2012

Butter Beans Kootu

Ingredients

Butter beans - 2 cups (Seeds after separating from pods)
Salt - To Taste
Coconut grating - 5 tbsp
Green chilli - 3
Fennel (perunjeeragam) - 1 tbsp
Ginger - 1/2 inch
Cinnamon - 1/2 inch
Seasoning
Oil - 2 tbsp
Mustard + Urad dhal - 1/2 tbsp
Onion (chopped) - 2 tbsp
Curry leaves - 5 Nos.


Method

  1. Remove the bean seeds from the pods. Wash them & put them in a pressure cooker.(No need to soak them overnight)
  2. Add salt to taste and water just to cover the butter beans.
  3. Pressure cook over a medium - high heat. Turn OFF the stove when the 1st whistle is about to come. (Else, the butter beans will turn mushy)
  4. Drain out the excess water & keep the beans aside.
  5. In a mixie / blender, grind the coconut gratings, green chilli, fennel, ginger and cinnamon. 
  6. In a frying pan, add oil. When hot, add the mustard & urad dhal. Let them splutter.
  7. Now, add the chopped onion and curry leaves.
  8. When the onions start to turn brown, add the beans and the grind masala.
  9. Add salt, if necessary.
  10. Cook this for about 3 min over medium heat. 
  11. Take care not to burn the bottom or mash the beans.
  12. Serve as a side for rice.

Note

  1. No need to soak the beans since these are taken out fresh from the pods.
  2. In some regions, these butter beans are also called lima beans.
  3. If these bean seeds are dried & packed, then they need to be soaked overnight before cooking.

Saturday, July 21, 2012

Spinach Paratha

This recipe makes about 10 medium - sized parathas sufficient for 2 - 3 people.

Ingredients

Wheat flour (Atta) - 1 1/2 cups
Salt - 1 tsp
Oil - 1 tbsp
Warm Water (microwaved for 30 sec) - 1/2 cup
Chopped Spinach - 2 cups
All purpose flour - For dusting

Method

Dough Kneading:

By Hand
  1. In a wide bowl, take the wheat flour and add the salt, oil & chopped spinach. Mix them together.
  2. Add warm water (generously) to form a soft dough. Do not add water little by little.
  3. Place the dough on the countertop & knead for 5 min, adding little oil / flour, if needed.
  4. This dough should be as soft as a baby's cheeks when touched. If so, the parathas will be really soft.
  5. This dough can be used immediately or after some hours (close the bowl with a lid & let the dough rest)
Using Food Processor
  1. Fix either the dough blade / chopping blade to the food processor. (* Both blades will grind the spinach & make the parathas green.)
  2. Add the wheat flour, salt, oil & chopped spinach. Turn ON for 30 sec so that everything mixes together.
  3. Keeping the food processor ON, add warm water (slowly but continuously) to form a soft dough. The dough should form a ball together. This is when the food processor should be turned OFF.
  4. This dough should be as soft as a baby's cheeks when touched. If so, the parathas will be super soft.
  5. Dust the counter top with a little all purpose flour. Place the dough on the countertop & knead for 30 sec.
  6. This dough can be used immediately or after some hours (close the bowl with a lid & let the dough rest) 
  7. The dough can be wrapped in ziplocs and can be freezed. Trust me....the parathas will be really soft even if made after a week.

Rolling Out:
  1. Now, make lemon sized balls out of the dough.
  2. Take a dough ball, coat it in the flour and roll out into a thin circular / square / rectangular / oval discs using a rolling pin.
Chappathi Making:
  1. Heat a dosa tawa / griddle.
  2. Brush the tawa with a little oil using a pastry brush and place the rolled out paratha.
  3. Brush some oil on top of the parathas.
  4. When the top side of the parathas starts puffing up slightly, flip it so that the other side gets cooked for about a minute.
  5. Once done, place the parathas in a hot box or cover (roll) them with soft towels / paper towels to retain the softness.
  6. Serve hot with chicken / mutton kurma or any vegetable kurma or paneer masala.
  7. These parathas stay soft even the next day.


Heart shaped spinach parathas for valentine's day


Note
  1. These can be called "green chappatis" sine the spinach make them all green.
  2. All purpose flour is used for dusting because it gets absorbed into the dough and can't be felt outside.


Recommendation
  • I would highly recommend a food processor for making chappati / paratha dough. I always get very soft chappathis / parathas when I use my food processor for dough kneading. Thanks to my dear friend Suja Moses for introducing to me the food processor dough kneading art. Now I'm rocking in my kitchen with these amazingly soft chappathis.