Thursday, June 19, 2014

Painted Pine Cones

This is a super simple project to be done with the kids. Take the kids for a walk and gather some pine cones from under the trees on the streets. Let them grab their paints and paint brush & have some fun painting.

What you'll Need

Pine Cones
Paint
Paint Brush
Glitter Glue (optional)
Beads (optional)


Method

  1. Collect the fallen pine cones from under the trees by the end of autumn before it gets all covered with snow.
  2. Grab different colors of paint and using a regular paint brush, give 2 coats of paint on each pine cone.
  3. Let them dry completely.
  4. Use glitter glue and beads to decorate (optional)
  5. Use them to decorate the home for Christmas or however you desire.


Note
  1. Collect pine cones that are not broken & free of dirt.
  2. Kids' paint works well on these pine cones.
  3. Always use glitter once the paint is dried completely. Else, the glitter will get the color of the paint.

Monday, April 28, 2014

Maangai Paruppu Kuzhumbhu (Tirunelveli Style)

Ingredients

Toor Dhal - 1/2 cup
Moong Dhal - 1/4 cup
Brinjal - 2 (cut to bite size pieces)
Tomato - 1 (cut to bite size pieces)
Small onions -10 Nos.
Garlic pods - 5
Hing (Asafoetida) - 1 tsp
Turmeric powder - 1/2 tsp
Cumin - 1/2 tsp
Green chilli - 2
Coconut Flakes - 3 tbsp
Raw Mango - 5 big slices
Tamarind - 1 pod
Coriander leaves - To garnish
Salt - To taste

Seasoning:
Oil - 3 tbsp
Mustard - 1/4 tsp
Urad dhal - 1/4 tsp
Red chilli - 1 (optional)
Onion - 2 tbsp
Curry leaves - 10 Nos.


Method
  1. Add the following ingredients to the pressure cooker: Tood dhal, moong dhal, brinjal, tomato, onions, garlic, hing, turmeric, cumin and green chillies.
  2. Add enough water to cover the ingredients. 
  3. Pressure cook for 15 minutes over a medium - high heat.
  4. After the steam is released, mash the contents of the pressure cooker with a potato masher / 'mathu'.
  5. Add the mango slices. Add the giant mango seed (if you love mango so much like me).
  6. Soak the tamarind in water and add the tamarind extract.
  7. Add more water if needed.
  8. Add in the coconut flakes.
  9. Do the seasoning and add to the cooker.
  10. Boil (with lid open) for about 15 minutes till the mango is completely cooked.
  11. Garnish with coriander leaves.
  12. Serve with white rice / brown rice / dosa / pongal.
  13. With 'no tamarind' serve with idlis.
Note
  1. Reduce tamarind when more mango slices are added.
  2. Tamarind can be completely removed from the list and can be replaced by a whole big mango & 3 tomatoes.

Sunday, April 13, 2014

Easter Basket

Easter is right around the corner and now is the perfect time to make these super cute Easter baskets to present to your loved ones.

Easter is not about the eggs or bunnies or chicken or spring . Its all about " Jesus died for my sins ....but HE rose again the third day. HE IS ALIVE!!!" So what is more fun about these baskets is that you can hide a note of hope and faith inside the egg along with the candies,  like "He is risen" , "My Redeemer lives" , etc.


What You'll Need:

Card stock / Scrapbook Paper / Patterned printed A4 sheet -1
Coffee Filter - 1
Cupcake liner - 1
Contrast color paper strip / ribbon -  to make a bow
White School Glue
Easter Grass / Strips of green tissue paper
Plastic Eggs -2
Candies (of choice)
Notes of hope / faith -  Handwritten or printed

How to do:

  1. Cut the card stock paper about 10" x 2". Cut another patterned paper about 10" x 1". Glue the patterned paper on top of the other. 
  2. Glue the ends together to make the base of the basket.
  3. Cut the upper half of the coffee filter and glue it to the inside of the base of the basket.
  4. Cut the card stock paper about 10" x 1". Cut another patterned paper about 10" x 1/2". Glue the patterned paper on top of the other. This makes the handle of the basket.
  5. Glue the handle to the inside of the coffee filter. (This will be hidden later)
  6. Now, glue the cupcake liner to the inside of coffee filter.
  7. Make a paper or ribbon bow and glue to the handle.
  8. Fill the basket with Easter grass (available in craft stores) or strips of green tissue paper and candy filled eggs with the note of hope.
  9. Surprise your loved ones.
  10. Have a blessed Easter.


Saturday, March 29, 2014

Egg Carton Bulletin Board

What you'll Need

Cardboard Egg Cartons
Paint (optional)
Push Pins

Method

  1. Take the cardboard egg cartons and paint them however you want. (But it took me a lot of paint than expected)
  2. Using push pins, fix them to the wall.(once the paint is all dried up)
  3. Your bulletin board is ready to use.
  4. Use school glue to put up any info on the bulletin board. The papers can be removed easily when not required.

Saturday, March 22, 2014

Oven Baked Fish

Ingredients

Fish Pieces - 10 Nos.
Fish Fry Masala - 2 tbsp
Red Chilli powder - 1/2 tbsp
Turmeric (optional) - 1/4 tsp
Salt - To Taste
Lemon Juice - About 10 drops


Method

Marinating:

  1. Wash the fish pieces really well. Drain the water completely.
  2. Take the fish pieces in a bowl. Add all the other ingredients to the fish pieces.
  3. Mix them well. Check for salt.
  4. Keep in the freezer for an hour OR refrigerate 2 - 3 hrs.
Baking in the Oven:
  1. Pre - heat the oven to 400 F.
  2. Grease a baking tray with oil (Olive oil / any refined oil)
  3. Arrange the fish pieces on the baking tray.
  4. Bake for 20 minutes on the lower- most tray.
  5. Flip over the fish pieces and bake for another 20 min.
  6. Turn the oven to BROIL mode and broil the fish for 2 -3 min.
  7. Serve as an appetizer OR enjoy as a side with rice and fish kuzhumbhu / sambhar / paruppu kuzhumbhu / dhal or any variety rice.
Note
  1. Every oven is different. So baking time may change a bit by + / - 5 min.
  2. If the fish pieces are thin, then 20 + 20 minutes should be fine for baking. If the pieces are thick, then 10 more minutes is needed for perfect cooking.
  3. The Fish Fry masala can be replaced by 1 tbsp of red chilli powder.
  4. In case, after 10 min of baking, if the baking tray has water oozed out from the fish, do the following: take all the fish pieces in a bowl, pour out the water in the sink, add little salt and chilli powder (to compensate for their loss in the water) arrange them back in the tray and continue baking.

Friday, February 28, 2014

Christmas Picture Frames


What you'll Need

Picture Frames (with framing glass)
Onion Bags
Christmas bows

Method

  1. Take the photo frames you wish to use. I bought these 2 photo frames at Ikea for $1 (pretty cheap...right?)
  2. Take out the picture framing glass and use it to cut a perfect size of the onion bag.
  3. Hold the cut onion bag along with the picture framing glass, and carefully insert them into the picture frame.
  4. Slowly remove the picture framing glass. 
  5. Use a bow around the frame to give a christmas feel.
  6. Use them along with the other christmas decorations.

Note
  1. I used 'red pearl onion ' bags, because the bags are strong , tightly weaved and red in color.
  2. In the same way, 'yellow pearl onion' bags can be used to make some Easter picture frames.

Monday, February 10, 2014

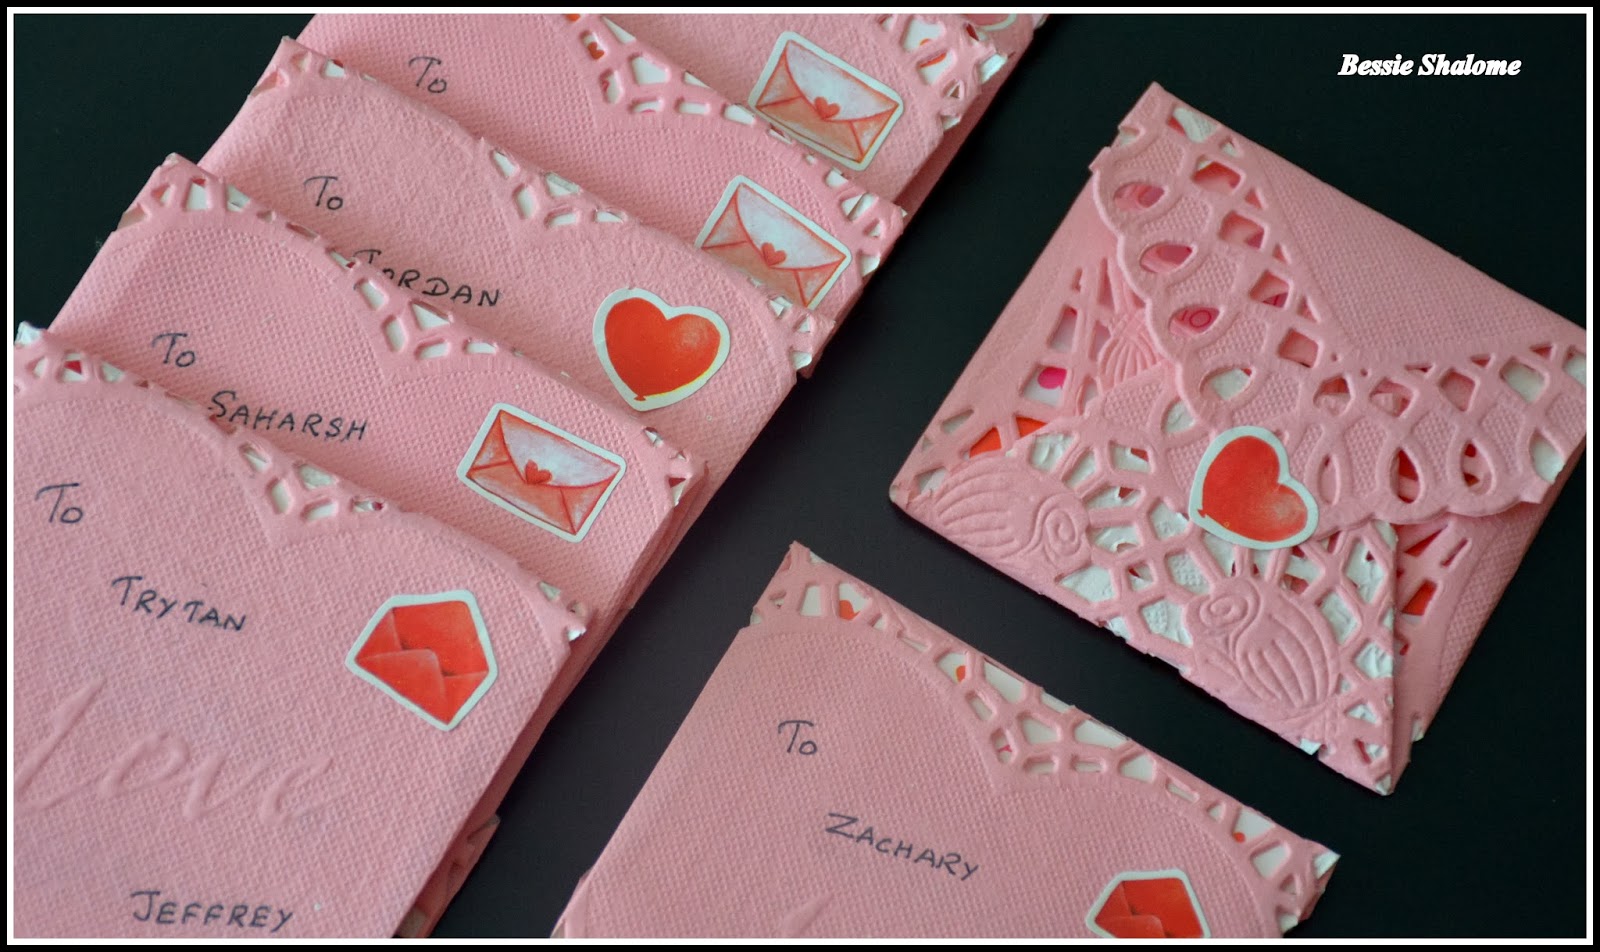
Doily Mail Envelope


Valentine's day is almost here & as my kiddo wanted to make cards for all his friends at class, we came out with the idea of these super cute easy - to - make envelopes to hold the cards we made. They turned out so cute and lovely.


What You'll Need

Heart Doilies
Stickers
Cards / Notes / Paintings / Pictures - To go in the envelopes


Method

  1. Lay flat a heart doily with the (preferred) side down.
  2. Fold one side towards the center.
  3. Fold the other side towards the center so that both flaps overlap / touch each other.
  4. Fold in the corners (top of pic 4) so they won't peek out.
  5. Fold in this side towards the center.
  6. Slide in a card / picture of your choice.
  7. Close the envelope and seal it with glue / sticker.
  8. Turn to the other side, write the address and stamp it.
  9. Your doily mail envelope is ready to be delivered.


Tuesday, January 28, 2014

Paper Mache Planets


What you'll Need

Balloons
Cloth clips
Paint
All purpose Flour
Water
Bowl / Glass of different sizes to hold the balloons
Newspaper strips
Thin Rope - For tying & hanging

Method

  1. Blow up the balloons corresponding to the size of the planets and tie a knot on each balloon. (Mercury is small...Jupiter is the largest....Other planets' size vary in-between)
  2. Hold a balloon in a bowl / glass so its easy to apply the paper mache.
  3. In a big bowl, mix 1 part of flour to 2 parts of water. 
  4. Tear the newspaper into 2 cm wide strips.
  5. Dip a strip of newspaper into the flour - water mixture, wipe off the excess and stick on the balloon.
  6. Do this until the balloon is completely covered with the paper strips (except the balloon knot)
  7. Now the first layer of paper mache is done. 
  8. Using a cloth clip on the balloon knot, hang on a hanger and let it dry overnight.
  9. Do another layer of paper mache and dry overnight.
  10. Do a third layer of paper mache and dry as before. (3 layers are needed else the planets can deform easily)
  11. Poke a small hole in the balloon to release the air and take the balloon out.
  12. Seal the top hole with paper mache. (I don't do this because the hole is gonna face the roof and can't be seen)
  13. Grab some paint and paint the planet with a paint brush (like kids use for painting)
  14. Punch / poke 2 small holes and tie a knot with a rope easy enough for hanging.
  15. Do like this for all the planets.


Special Note
  1. To make Saturn's ring, I cut out the center of a small paper plate and painted it with the brightest color I had. Make sure to insert the ring from above through the rope before hanging it.
  2. Make sure the paper mache dries completely before adding each layer to avoid deformation.
  3. The paint I used are from my kids' cabinet. They worked amazingly.
  4. For small planets, I used water balloons.
  5. Pluto may not be considered as a planet now by scientists.
  6. In the flour to water mixture, the water proportion can always be varied between 1 1/2 to 2 parts for every 1 part of flour.
  7. After some google search, I figured out the following colors for the planets:  
Planets
Colors Used
Mercury
Brown & dark yellow
Venus
Light yellow, orange & red
Earth
Green, light blue, dark blue & white
Mars
Dark red & black
Jupiter
Dark drown & light brown
Saturn
Green with a bright colored ring
Uranus
Light blue
Neptune
Dark blue
Pluto
Black

Friday, January 24, 2014

Kuruma Kuzhumbhu


Kuruma Kuzhumbhu is a rice accompaniment with the flavours of kuruma since the masala includes fennel along with ginger & garlic....but also includes tamarind which makes it go well with rice.


Ingredients

Oil - 1 tbsp
Cinnamon - 1 inch piece
Potatoes - 1 (cut into big cubes)
Tomato - 1
Tamarind - 1 pod
Red chilli powder - 2 tsp
Coriander powder - 2 tsp
Turmeric powder - 1/4 tsp
Salt - To Taste

For Masala:

Coconut flakes - 1/4 cup
Fennel (Perunjeeragam) - 1 tsp
Ginger - 1/2 inch piece
Garlic - 3 pods

For Seasoning:

Oil - 2 tbsp
Mustard - 1/4 tsp
Urad dhal - 1/4 tsp
Chopped Onion - 1 tbsp
Curry leaves - 10 Nos.

Method

  1. In a pan, add 1 tbsp of oil & add the cinnamon.
  2. Now add the potato cubes and tomato slices and fry them for a minute.
  3. In a mixer / blender, grind the masala with a little water, and add to the pan.
  4. Soak the tamarind in water & add in the tamarind extract.
  5. Add the chilli powder, coriander powder, turmeric powder & salt.
  6. Let this boil on a medium heat till its half - way done.
  7. Do the seasoning and add to the pan.
  8. Boil on a low - medium heat till the required consistency is reached.
  9. Serve with white rice / brown rice.


Note
  1. Ginger and garlic can be replaced by ginger - garlic paste. About 1 1/2 tsp of ginger - garlic paste can be added.

Tuesday, January 21, 2014

Avial (Tirunelveli Style)


Ingredients

Carrot - 1 (large)
Beans - 10
Peas - 1/2 handful
Potato - 1/2 (large)
Brinjal - 2
Raw Mango (optional) - 1/2 
Plantain (Valaikkai) (optional) - 1
Cauliflower (optional) - 10 florets
Drumstick (optional) - 2
Tomato (optional)
Tamarind - 1/2 pod
Turmeric - 1/2 tsp
Salt - To taste
Water (As needed) - To cook veges

For Masala:

Coconut Flakes - 1/4 cup
Green Chillies - As needed
Cumin - 1/2 tbsp

For Seasoning:

Oil - 2tbsp
Mustard - 1/4 tsp
Urad Dhal - 1/4 tsp
Chopped Onion - 2 tbsp
Curry Leaves - 10 Nos.

Method
  1. Have a bowl of water ready to put the cut vegetables, so they won't change color.
  2. Slice the carrots round or cut them into 1 inch cubes.
  3. Cut the beans into 1 inch long pieces.
  4. Cut the brinjal, potato, mango and plantain into 1 inch cubes.
  5. Cut the drumstick into 2 inch long pieces.
  6. Add all these veges to the bowl of water and wash them really good.
  7. To a pan, add all the vegetables. Add tomato if desired.
  8. Add turmeric and salt.
  9. Add tamarind water. 
  10. Add water enough to cover the vegetables. Cook them on a med - high heat, till they are half way done.
  11. In a mixer / blender, grind the masala to a fine paste, adding little water.
  12. Now, add the masala to the vegetables.
  13. Do the seasoning and add to the vegetables.
  14. Check for salt at this point.
  15. Using a spatula, very gently turn the veges, every 2 minutes.
  16. Simmer at a low - medium heat until all the water is evaporated.
  17. Serve as a side for rice with sambhar or dhal.

Note
  1. I personally prefer to add brinjal 'coz it gets kind of mashed easily and the seeds give a beautiful look and feel to the dish. Eggplant, on the other hand, can also be added, but it just gets soft when cooked.
  2. The optional vegetables can be skipped while making the dish.